

When your new fiscal year is approaching, we recommend completing an annual system review in Sage Intacct to close the year on a high note and start the next on the right note. This article contains our top 10 Sage Intacct year-end system review tips and best practice recommendations.
Top 10 List
- Users, Roles, & Permissions
- Approval Policies & Workflows – GL, AP, & Purchasing
- Reporting Periods
- Budgets
- Checklists
- Form 1099 Prep
- Price Lists – Purchasing & Order Entry
- Tax Rates
- Credit Card Expiration Dates
- Future-Dated Transactions
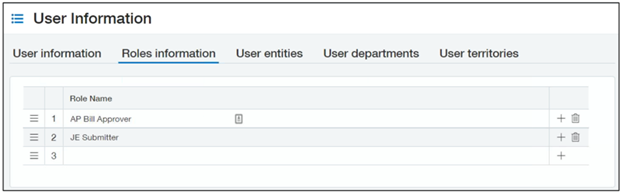
1. Users, Roles, & Permissions
Review your company’s user directory to confirm that only appropriate users have access and that user types and roles are accurate. Permissions may need to be updated for new employees, job changes, or employees who serve as backup for other team members.
Also, review roles in the system to assess if any user assignments have changed or the permissions granted to a role need to be updated.
Users and roles can be found in Applications > Company > Admin > Users, roles and groups.
If permissions have not been updated with each quarterly Sage Intacct release, then new functionality may be missing for certain users.
2. Approval Policies & Workflows
After updating users and roles, it may be good to review approval workflows throughout the system. You may have approval policies in place for journal entries, accounts payable (AP) bills, AP payments, and purchasing transactions. On an annual basis, approval policies should be reviewed to confirm they are accurate and meet current business needs.
Considerations for approval workflow changes may include new employees, user roles that have been modified, dollar threshold changes for approval tiers, department manager changes, new or updated purchasing workflows, or an update to the frequency of journal entry approval email notifications.
Ways to access approvals are listed here:
- General Ledger > Setup > Configuration (journal entry approvals by journal)
- Accounts Payable > Setup > Configuration (both bill and payment approvals)
- Purchasing > Setup > More > Approval policies or Purchasing > Setup > Configuration
3. Reporting Periods
Review reporting periods to confirm periods are available for reporting and budgeting for the new year and subsequent year, as needed. Reporting periods are set up initially during implementation as part of the configuration of the General Ledger (GL) application. Sage Intacct creates default reporting periods for a three-year period, e.g., Last Year = 2021, This Year = 2022, and Next Year = 2023.
Each January, a user with appropriate permissions can create default reporting periods for the next, subsequent year. Starting January 1, 2023, the 2024 reporting periods can be created for reporting and budgeting purposes.
Users can create new reporting periods in one of three ways. The first option is to navigate to Company > Setup > Import data > Set Up General Ledger Transactions and find Reporting Periods. Use the Default option to create new periods. Sage Intacct will only create the periods in the three-year range that do not currently exist.
The second option is to import new reporting periods. An import can be done at any time of the year. Navigate to Company > Setup > Import data > Set Up General Ledger Transactions and find Reporting Periods. Use the Template option to download and complete the required fields for the periods to import. Save the file as CSV and use the Import option on the Company Setup Checklist to import the file.
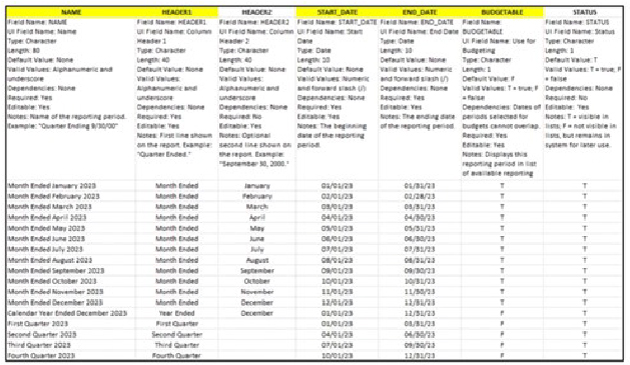
When importing reporting periods, it’s important to note that “budgetable” reporting periods cannot overlap. As an example, months and the quarter containing those months cannot both be marked as “budgetable.” Use a value of “F” for False in the “budgetable” column of the import template for the quarterly periods.

As a third option, future reporting periods also can be created using a draft journal entry saved prior to selecting the Default option from the Company Setup Checklist. Create a draft journal entry for a debit and credit of $1.00 with a posting date as far out into the future as you’d like reporting periods to be created. Navigate to Company > Setup > Import data > Set Up General Ledger Transactions and find Reporting Periods. When you select the Default option, Sage Intacct will recognize the future posting date of the draft journal entry and create all reporting periods up to the period containing that date that do not exist already.
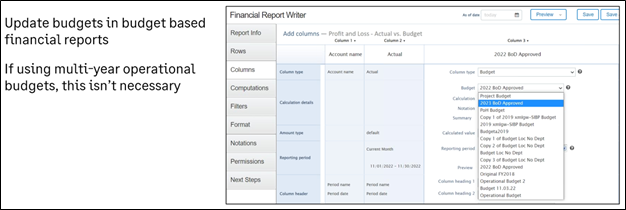
4. Budgets
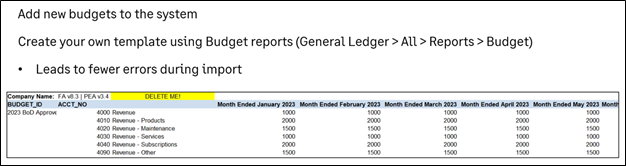
Review all financial reports that use budgets and update Budget IDs to new IDs for the new year. If you use multiyear financial or operational Budget IDs or “generic” Budget ID names (such as Annual Budget, Department Budget, etc.), then this review step is not necessary.
For budgets, you also can create your own budget import template with your reporting period naming conventions created as discussed in the previous section (second option for importing) using the Standard Budget report. This can lead to fewer errors when importing budget data.
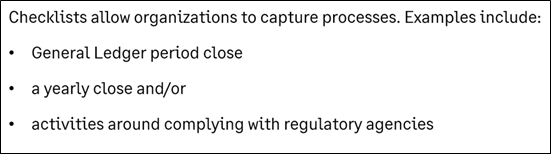
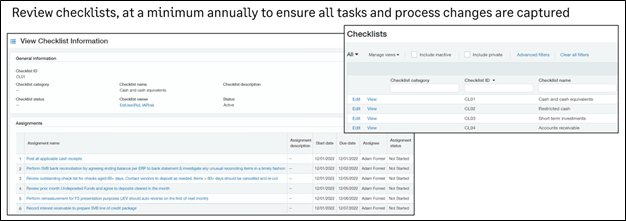
5. Checklists
Navigate to Company > Setup > Checklists. Review Checklists and Assignments for steps to add or remove and any user changes associated with Assignments. New Checklists may need to be added to accommodate new entities, new Sage Intacct applications, or other modifications to business processes.
6. Form 1099 Prep
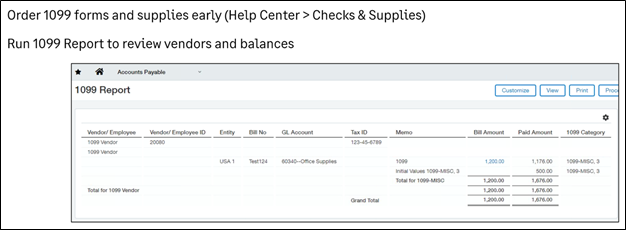
Begin preparing for Form 1099 season early. Order any necessary forms and supplies using the “Checks & Supplies” link available in the Sage Intacct Help Center. Run 1099 reports to review Vendors and 1099 balances for amounts paid during the year. Validate that all applicable Vendors have been designated as a 1099 Vendor on the corresponding Vendor record (see the “Additional information” tab).
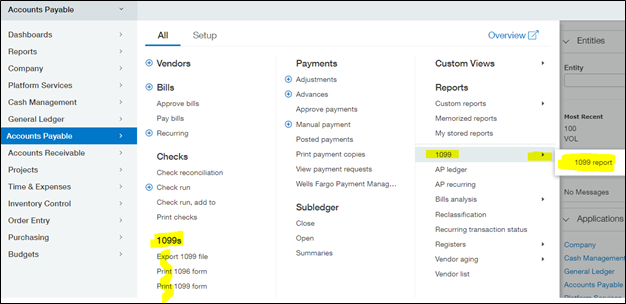
The menu locations to access 1099 reports have changed recently. The 1099 reports section to export and print forms now is displayed in the first column under the Accounts Payable > All menu. The 1099 report also can still be found in the Accounts Payable > All > Reports section.
If the 1099 review results in changes that need to be made to Vendors or AP transactions, use the appropriate template to update existing records. Navigate to Company > Setup > Import data to open the Company Setup Checklist. Scroll down to the Set Up AP Master List section to find the Vendor 1099 Transaction Update template.
If your organization began transacting in Sage Intacct during 2022, then Vendor payments may have been generated out of your legacy system for a number of months prior to going live in the system. Those Vendor 1099 initial values for the portion of the year before your go-live date can be imported using the Vendor 1099 Opening Balances template. The values also can be added manually in the Vendor record “Additional information” tab.

7. Price Lists
Price lists are maintained in Sage Intacct to use in Purchasing and Order Entry transactions. If you use price lists, it’s a good practice to review and update the lists annually or on a timeline that coincides with Vendor and internal sales teams’ rate change frequencies.
Price lists — Purchasing (intacct.com)
Price list entries — Order Entry (intacct.com)
An import can be used to update existing price lists, but the information needs to be exact.
Use a custom report or custom list view to capture all current information for each item detail in price lists before making any annual updates. Fill in all required fields and existing fields currently used so existing values will not be overridden with blank fields by mistake.
A price list update process also should include steps to review lists assigned to Customers, Vendors, and purchasing and order entry transactions to verify the correct price list is assigned where applicable.
8. Tax Rates
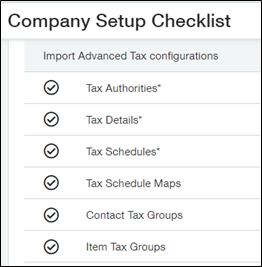
For companies using Advanced Tax functionality in Sage Intacct, year-end is a great time to review and update all elements used in Advanced Tax. This includes Tax Authorities, Tax Details (rates), Tax Schedules, Tax Schedule Maps, and the assignment of Contact Tax Groups and Item Tax Groups throughout the system. As governments and regulatory bodies update tax rates for a new calendar year, you can use an import file to update tax rates in Sage Intacct or manually update the rates.
Similar to the import template for price lists, the import templates for Tax Authorities, Tax Details (rates), and Tax Schedules are designed to update existing records. The information needs to be exact. Fill in all required fields and existing fields currently used so existing values will not be overridden with blank fields by mistake.
Advanced Tax objects can be accessed from either Accounts Receivable > Setup > Tax or Order Entry > Setup > Tax.
Advanced Tax overview (intacct.com)
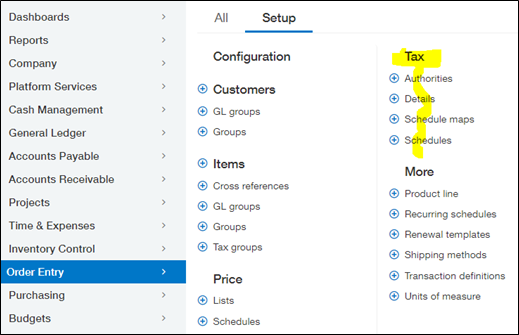
The Company Setup Checklist also has a specific section for Advanced Tax templates.
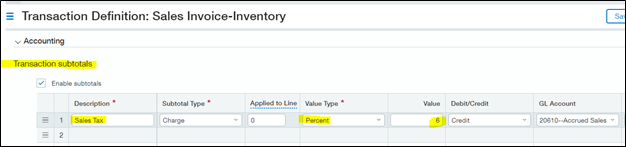
If you are using simple sales tax rates in Order Entry transaction definitions, these rates should be reviewed to verify if the jurisdiction(s) changed the rate(s) for the new year.
To access and update simple tax rates, navigate to Order Entry > Setup > More > Transaction definitions. Find a transaction name with sales tax configured and select Edit. Scroll down to the Accounting section and make any necessary edits in the Transaction subtotals table.
If you use a third-party solution for taxes within your Sage Intacct system, then this step may not be necessary as most tax services update for rate changes as part of their integration. Contact your tax service partner if you have any questions about their update process.
9. Credit Card Expiration Dates
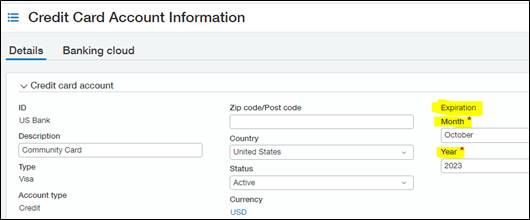
Review expiration dates on credit cards set up in Cash Management to keep card records current. System issues can occur sometimes if the expiration date has passed and users try to enter card transactions or pay AP bills with the card account. Updating card expiration dates can be done at any point during the year. Setting a reminder to review the card dates in December or January each year is a proactive way to keep the card account functioning as the system intended. Credit cards can be found at Cash Management > All > Accounts > Credit cards.
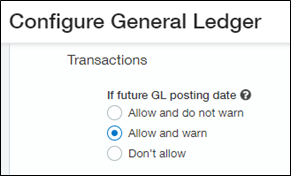
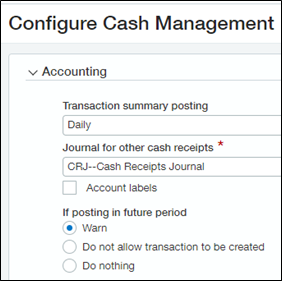
10. Future-Dated Transactions
The final review step in our “Top 10” list relates to future-dated transaction settings in four core modules of Sage Intacct.
Before you begin entering transactions in the first month of a new year, take some time to review the configuration settings in GL, Cash Management, AP, and Accounts Receivable (AR). Be sure your selected choices for system behavior are set up appropriately for future-dated transactions. These settings are especially important for January 2023 transaction entry when users are still “working” in December 2022 and need to date transactions to post in the prior month. The three settings to choose from are described below.
WARNING (and continue): The “Allow and warn” setting in GL and the “Warn” settings in Cash Management, AP, and AR will display yellow warning messages to let users know if they are attempting to post to 12/DD/2023 rather than 12/DD/2022 when they manually edit date fields to post back to December. Note: A warning message does not stop users from posting transactions; they may continue and post without changing the dates.
ERROR (and stop!): The “Don’t allow” setting in GL and the “Do not allow transaction to be created” setting in Cash Management, AP, and AR will display red error messages and users will not be able to post transactions until dates are changed.
DO NOTHING: We do not recommend using the “Allow and do not warn” or “Do nothing” settings during year-end transitional periods. Images are shown below for GL and Cash Management. The verbiage for AP and AR is similar to Cash Management.
That concludes our top 10 list. We hope our Sage Intacct year-end system review tips help you create efficiencies and keep your system up to date. If you have any questions or need assistance with your annual system review, please contact your Sage Intacct Partner.
Related reading: Check out our “Sage Intacct Year-End Processing Tips” for information on closing the books and related year-end general ledger closing topics.
The Business Technology Solutions Team at FORVIS is a Sage Partner. We provide implementation, training, and support services for Sage Intacct as well as other Sage applications. Use the Contact Us form below to get in touch.