

The Salesforce Spring '23 release is approaching quickly and we want to help your organization be prepared. Check out our list of noteworthy Salesforce Spring ’23 features for admins and other helpful information below.
The Spring '23 “major release” will be completed during the weekend of February 10, 2023. Your organization’s five-minute upgrade window can be found at status.salesforce.com. Search for your instance or domain and click the Maintenance tab to view the date and time.
Highlights for Admins
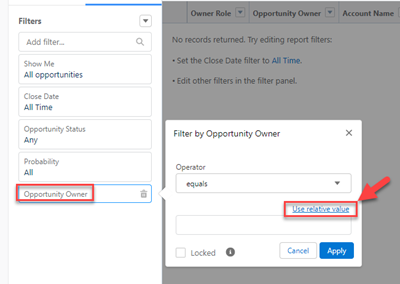
Create Personalized Report Filters
Reports can be set to filter per logged-in user. For example, an Opportunity report can be created that will filter to each user’s results. This filter can be used on fields such as Created by and Opportunity Owner—giving each user who looks at these reports their own personalized view.
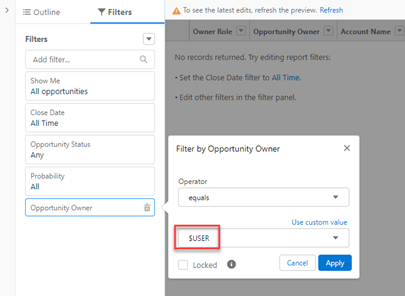
When creating the field filter, click on the “Use relative value” link and set the value to $USER. Then the field will populate the reference to the logged-in user.
Monitor Subscriptions to Reports & Dashboards
With this release, there’s a new report that can help you manage subscriptions to reports, dashboards, or analytic assets. To get started, create a custom report type on Analytic Notifications to view the source, owner, running user, and schedule of subscriptions.

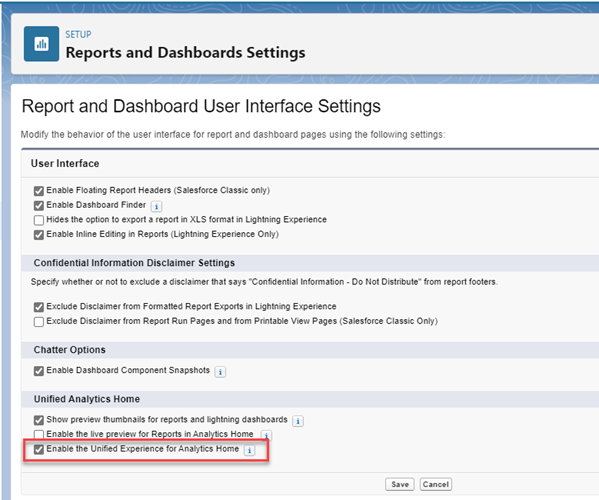
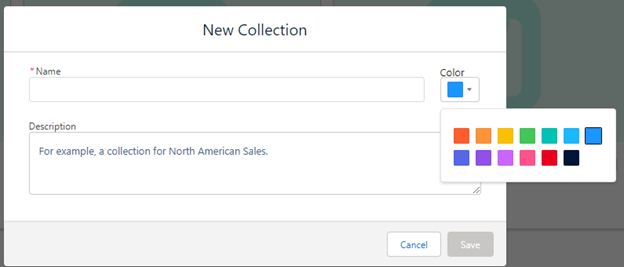
Add Reports & Dashboards to a Collection
Stay organized by adding reports and dashboards to collections. If there are reports and dashboards that you access frequently, you now can add a link to those records as part of a collection. The reports and dashboards don’t need to be in the same folders to be part of a collection.
To enable collections, go to Setup, enter “reports” in the Quick Find box, and then select Reports and Dashboards Settings. Select Enable the Unified Experience for Analytics Home. You also can get this feature by enabling it in Analytics settings on orgs with a CRM Analytics license. Also, this feature is disabled if it’s turned off in Analytics settings.
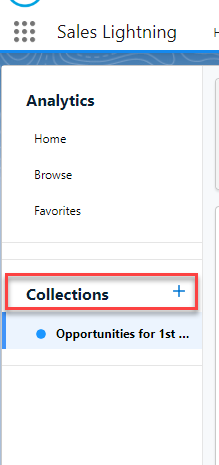
From the Analytics Home page, a collection element will be in the left pane. Click on the “+” icon to create a Collection. Give it a brief but descriptive name. You can provide more details in the Description area. You can choose the color block associated with it, too.
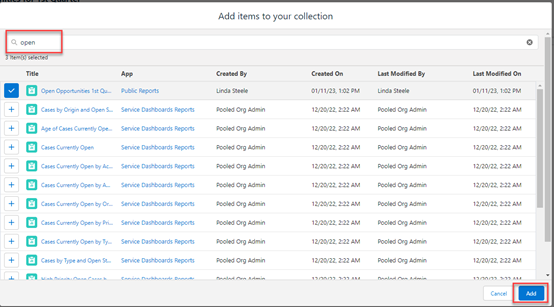
Once your collection is created, open it and click the Add button to add reports and dashboards to this collection.

Type in text to search for the reports and dashboards you’d like to include. Click the “+” icon to the left of each report or dashboard you want to include and then click the Add button in the lower right of the window to confirm the additions.
Track Field History for Tasks & Events
Field history tracking now is available for up to six fields on both Task and Event objects. See a list of changes to Tasks and Events after you turn on field history tracking in the Object Manager.
To enable this feature, open the object under Object Manager and select Fields & Relationships. In the upper right, select the Set History Tracking button.
![]()
Configure Case & Lead Record Pages with Dynamic Forms
In the Winter ’23 release, Dynamic Forms were released for account, person account, contact, opportunity, and custom object record pages. These forms now are available for Leads and Cases. Dynamic Forms allow you to have more control over the layout of fields and their visibility based on criteria. Dynamic Forms can be created from scratch or you can convert an existing record page.
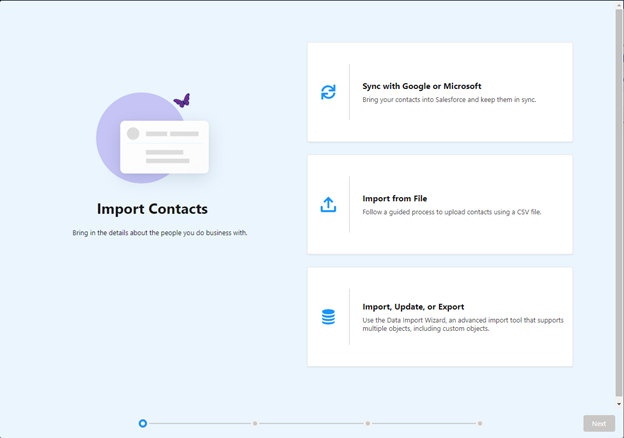
Provide Users a Simple Way to Import Contacts & Leads
As an admin, you can activate a new way for users to import contacts and leads that uses a sample CSV file and a simple data-mapping interface. The new import option can give users a choice about how to import data based on the features they have permission to use. Leads and Contacts now can be imported from the Object List View page. To activate this option, enable Basic Data Import from Setup.

Once it’s active, when you click the Import button on the Contacts or Leads home page, instead of opening the Data Import Wizard, the following screen opens with options shown below.
In addition, users who need a more robust data import experience will still have access to import tools they previously used.
See the full Salesforce Spring ’23 release notes for more information.
How FORVIS Can Help
Now that you know more about Salesforce Spring ’23 features for admins, are there features, workflows, or other changes we can help you with? With certified experience in Salesforce systems, the Business Technology Solutions Team at FORVIS is ready to assist. Use the Contact Us form below to get in touch.