

In Microsoft Dynamics 365 Business Central, you can do a lot with Excel. Since Excel is one of the most used tools in financial management, in this article we’ll show how the Business Central Excel add-in can be used. In Business Central list pages, and in some cases the Lines FastTab, you have the option to Open in Excel or Edit in Excel from the Share list.

Open in Excel
Here are some basics on the Open in Excel feature. This feature is not to be overlooked, as it can be a powerful reporting tool.
- When you choose the Open in Excel feature, you’ll download an Excel file that matches the list view on the Business Central page you have open.
- With this action, Excel respects any filters on the page that limit the records shown. The Excel workbook will contain the same rows and columns that appear on the Business Central page.
- You can use this data for reports, to create pivot tables, and more.
Edit in Excel
With the Edit in Excel feature, you can make changes to records in Excel and then publish the changes back to Business Central.
- With this action, Excel respects most filters on the page that limit the records shown. This means that the Excel workbook will contain almost the same records and columns.
- Also with this action, the number of fields available for reading and publishing edits from Excel is expanded. This includes being able to view and edit fields that are added through extensions.
- The Edit in Excel feature also has been enabled on various Sales and Purchase document subpages, such as Sales Order Lines. This can save significant time!
Note: For Business Central on-premises, the Open in Excel action is available by default; the Edit in Excel action is only available if the Excel add-in has been applied by your administrator.
Edit in Excel Feature Exploration
Let’s take a look at what the Edit in Excel feature can do. First thing to note, it’s a Data Connector add-in.
When you select Edit in Excel, Business Central will download a file that contains all the available fields in that table, not just those visible on the page.
To open the Excel file, you may need to sign into the Data Connector. This will be the same login you use for Business Central. When you open the Excel file, you’ll have a Data Connector window on the left. Caution: Don’t close this window—you’ll need it. Once your credentials are validated, Excel will open the existing rows from the open page. In this example, we’re using the Item List in Cronus.

The connector has the following options available:
- New
- Refresh
- Publish
- Filter
- Design
If you click on New, a new line will be added to the data range. Then, you can add new data. Select Publish to save the updates to Business Central.

You also can use the Excel add-in to delete rows. Rows can be deleted by using the delete function within Excel and then clicking on Publish.
To get the latest data from Business Central, choose Refresh. Note: If you’ve added data to the spreadsheet but haven’t published it yet, clicking on Refresh may cause you to lose the new data. The Refresh action pulls the latest data from Business Central and will overwrite anything that hasn’t been saved yet to Business Central.
Publish saves any changes you’ve made to the Excel document back to Business Central. If any changes can’t be saved, a warning or error message will appear.

To get details about errors, click on the flag icon in the lower right corner. This will include the error message and the record affected. The affected record also will turn red.


After you update the record or remove the error, you’ll need to click Publish again. If everything goes smoothly, the red highlighted record will return to its original color and the record will be published.
Note that when you’re publishing many rows and you receive a record error, in most cases, the rows not affected by an error will be updated in Business Central. The rows with errors will need to be corrected and the Publish action will need to be selected again for those changes to be saved in Business Central.
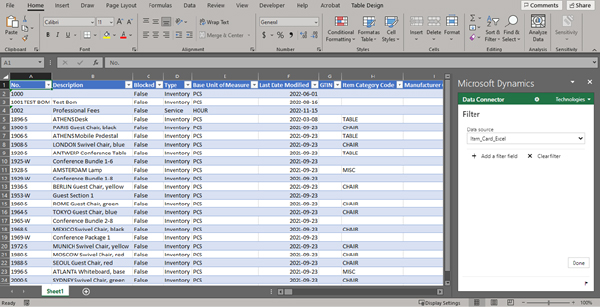
Here, we'll review the Filter option. In some lists, the Edit in Excel feature will apply a page filter. You can remove that filter to edit more records than just the ones initially exported.
- To remove the filter, click on the Filter option.
- Click on “Clear Filter.”
- Click on “Done.”
- Click on “Refresh” to add the newly available data.
Helpful tip: If you need to update Dimension requirements for a record, you can open the record in Edit in Excel, remove the filter, and then you’ll have access to all records in that table. This enables you to update the Dimension requirements for all records at one time, instead of individually.
Now, let’s get creative with Design functionality. When you select the Design action, the Data Connector will open the Design window.

If you want to add or remove fields within that table, simply click on the pencil icon to make edits. This is where you can see table details, including which fields are selected (visible on the table) and which are available (not visible on the table).

If you want to remove a field, you can click on it in the Selected fields area and then select Remove.
If you want to add a field, you can click on it in the Available fields and then select Add.
If you want to move a field location in the table, click on the field and use the up or down arrow options to move it to where you want.
Select Update when you’re done.

Helpful tip: You can switch the company you’re working with in Excel. To switch the company, select the Options icon in the Excel add-in pane, then select the company from the Company field.
One of the best use cases for Edit in Excel is when you have a large journal entry you need to input into Business Central, such as a payroll file from your payroll provider.
- To do this, open the General Journal and the Batch you want to use.
- In the Share icon, select Edit in Excel.
- Add the data to the file you want to import.
- Be sure to add the Journal and Batch names so Business Central will know what Journal to use.
- Select Publish.
- Then, sit back, sip your coffee, and enjoy some of that time you just saved!

How FORVIS Can Help
Now that you know more about how the Business Central Excel add-in can be used, what other questions do you have? The Business Technology Solutions Team at FORVIS is a Microsoft Dynamics Gold Partner and 2022-23 recipient of the Microsoft Inner Circle award. We provide analysis, design, implementation, upgrade, training, and support services for Business Central and other Microsoft Dynamics business applications. Use the Contact Us form below to get in touch.