

Manually moving data between Microsoft Dynamics 365 Business Central and other applications can be a time-consuming and error-prone task. Automating data exchange can be a game changer, helping you save valuable time and resources while reducing errors.
This article dives into Data Exchange Definitions in Business Central. We’ll guide you through the steps of configuring Data Exchange Definitions, covering everything from understanding how they work to mapping data fields. Explore how to automate your data exchange tasks and streamline your workflows.
What Are Data Exchange Definitions in Business Central?
Data Exchange Definitions are a powerful tool in Business Central that can help you seamlessly import and export data between your bank and other applications. This can save you time and effort, while also reducing the risk of errors associated with manual data entry.
For example, you can use a Data Exchange Definition to import bank statements directly into Business Central, decreasing the need to manually enter transaction data. You also can set up Data Exchange Definitions for Positive Pay Exports, to export sales data to your customer relationship management (CRM) system, and more.
How to Set Up Data Exchange Definitions in Business Central for Bank Import
Setting up Data Exchange Definitions in Business Central is a relatively straightforward process, but it does require some understanding of the data structure of the files with which you’re working. Here’s a step-by-step guide for creating a Data Exchange Definition that can be used for importing bank transactions to help streamline bank reconciliation.
- There are some preconfigured Data Exchange Definitions available for common tasks, such as importing bank statements and exporting sales data. You can use the preconfigured options as a starting point for creating your own custom Data Exchange Definitions.
- To create a custom data exchange file that can map to your bank’s file format specifications, start by getting the appropriate CSV file from your bank.
- Then, in Business Central, enter “Data Exchange Definitions” in the search tool to get to the Data Exchange Definition page.
- Next, create a new Data Exchange Definition by clicking the “New” button.
- To customize your Bank Data Exchange file, review the CSV file you downloaded or received from your bank. Identify what columns the Date, Check No., Description, and Amount are in. Label the column numbers on the Data Exchange Definition file you just created.
- In the example below, the columns in the CSV file from the bank have been numbered.
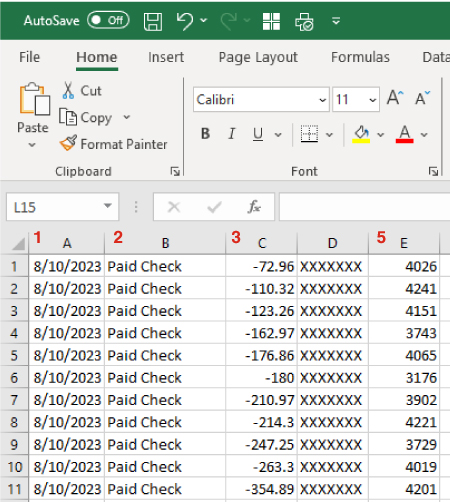
- The numbers correspond to the related columns on the Data Exchange Definition file below.
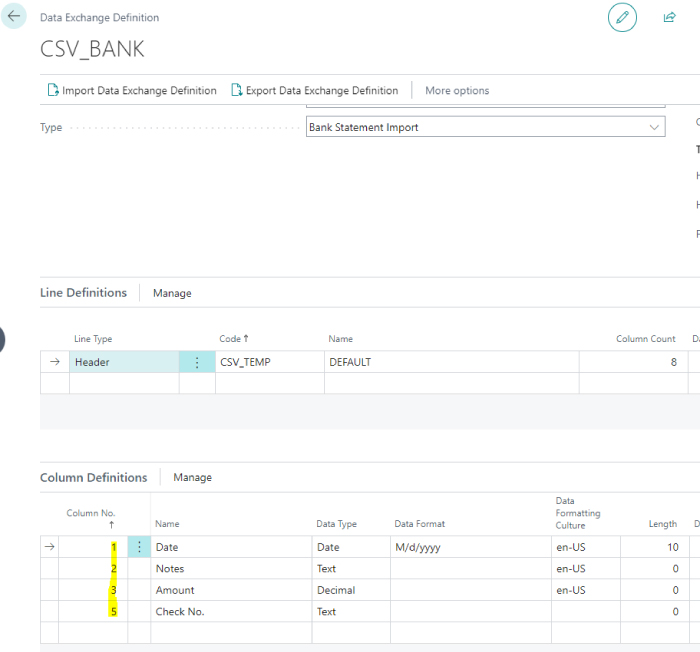
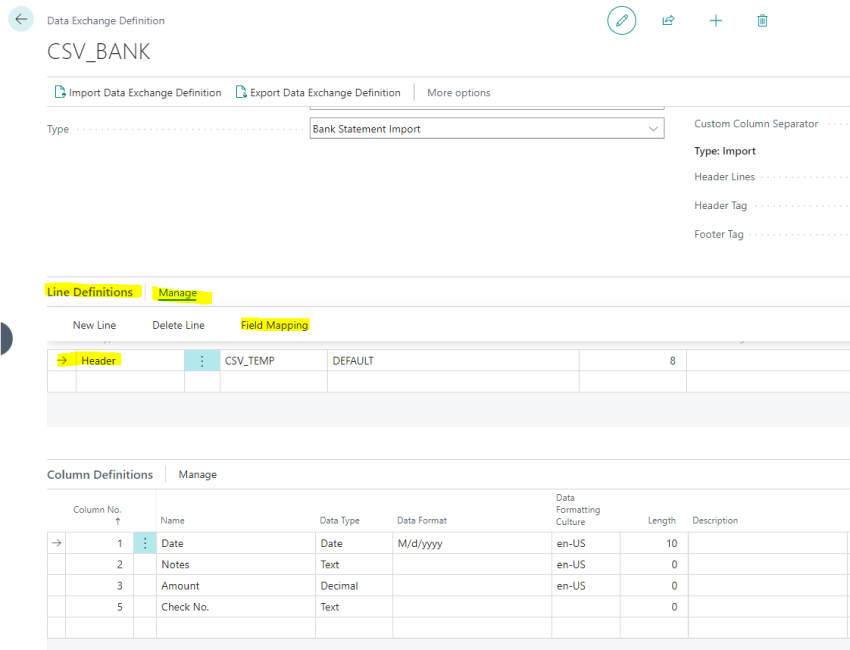
- Next, be sure the lines are mapped correctly to fields that are defined in the system. In Business Central, Data Exchange Definitions have three FastTabs: General, Line Definitions, and Column Definitions. Select “Line Definitions.” From the Header line, select “Manage” and then the “Field Mapping” option. This will cause a new screen to appear.
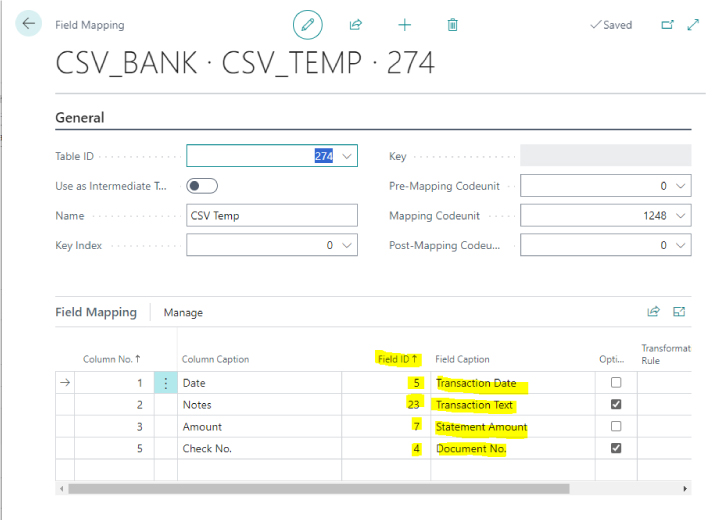
- From here, drill into the Field ID column to match the Field ID with the corresponding column numbers you labeled in the step above. Note: Only the “Transaction Date” and “Statement Amount” fields are required; the others can be marked as optional.
- Once you have completed mapping the data, you’ll need to create a line in the Bank Export/Import Setup Page.
- In the search tool, enter “Bank Export/Import Setup.”
- Once on the page, create a new line with a Code and Name. Then, choose “Import” for the Direction column and “1270” for the Processing Codeunit ID. Next, in the line under the “Data Exch. Def. Code” column, select the Data Exchange Definition Code that was generated (“CSV_BANK”).
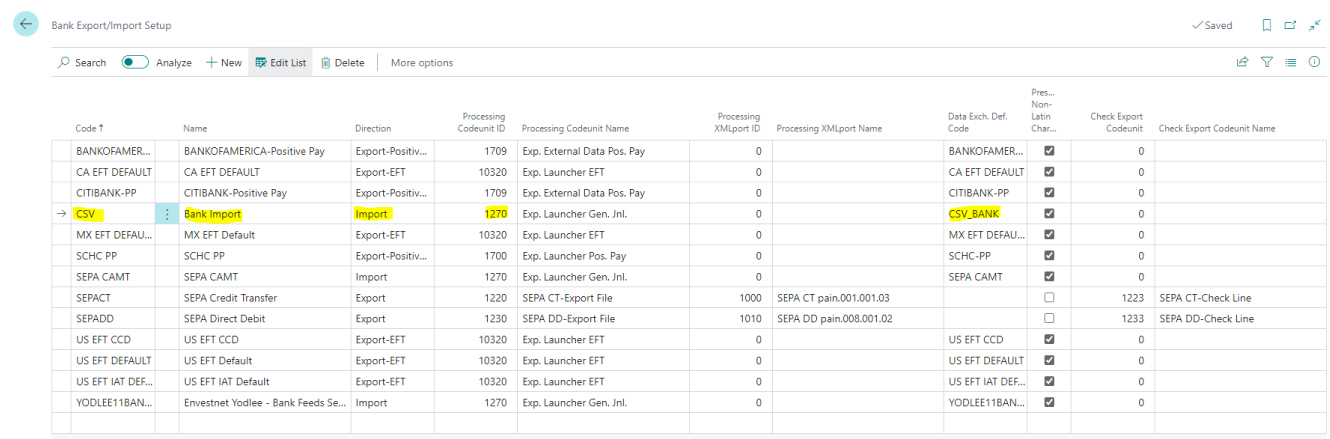
- Now that this line has been added to Bank Import/Export Setup, it needs to be added to Bank Accounts in Business Central.
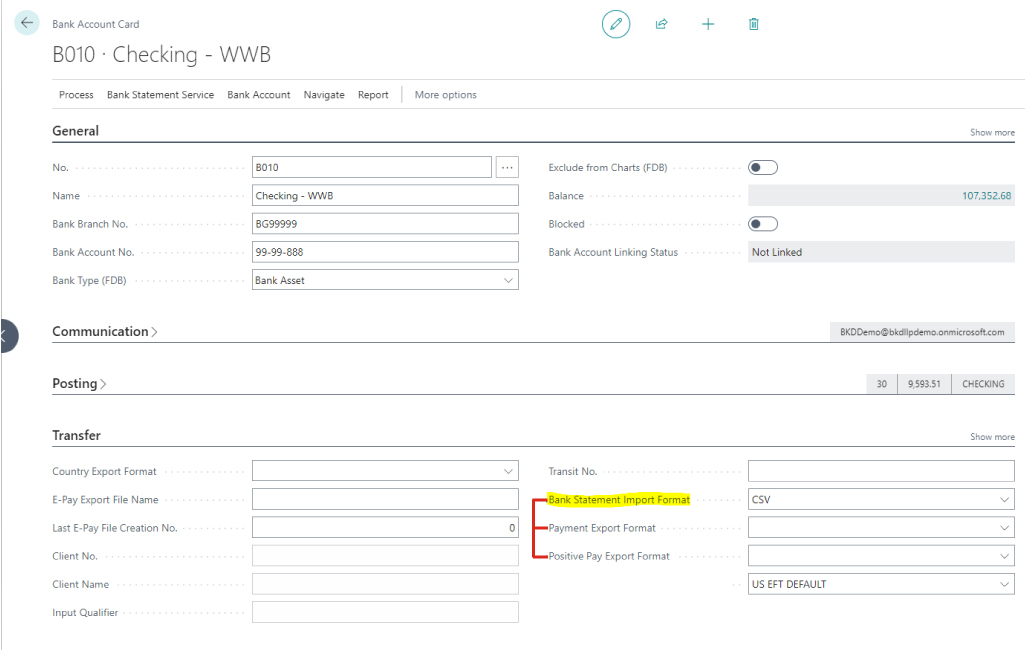
- Navigate to your bank account list. Select the corresponding Bank Account Card. Scroll down and add the Code you created in the step above (in this example, “CSV”) to the “Bank Statement Import Format” field. Note: This is also where you would add your Bank Import/Export Codes for Payment Exports and Positive Pay Exports.
- Now, an automated bank reconciliation process can begin!
- You can also create custom Data Exchange Definitions for EFT and Positive Pay Exports using these steps as a guide. Learn more about Positive Pay in Business Central.
Additional Tips for Setting Up Data Exchange Definitions
If you’re unsure about the data structure of your files, you can consult with your IT department or Microsoft Dynamics partner.
When mapping data fields, it’s important to pay attention to the data types of the fields. For example, a date field in one application may need to be mapped to a different data type, e.g., text, in Business Central.
By following these steps and tips, you can set up Data Exchange Definitions in Business Central to help automate your data exchange tasks and improve the efficiency of your workflows.
How FORVIS Can Help
Business Technology Solutions at FORVIS can help clients transform their business processes using Business Central and other software solutions. If you’d like to streamline more workflows or learn more about Business Central, connect with us today. We provide enterprise resource planning (ERP) and CRM platform analysis, design, implementation, upgrade, training, and support services, and we are a certified Microsoft Partner.